Why keeping your great Jarvis commands just for you? Share them and have the whole community using them!
It's easy, and a great way to make one's contribution to the project.
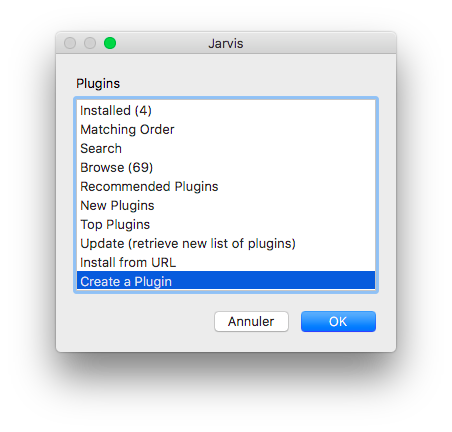
This is the 8 steps guide to create a plugin for Jarvis and publish it on the Store.
It will help you create a new plugin from a template (easiest way is to Fork it), update it, commit your changes and fill in a short form to publish it on the Store.
Ready? Let's go!
- Create a new Plugin from Jarvis in Menu > Plugins > Create a Plugin
Simply follow the instructions:- Provide a name for your plugin
- Your plugin will be created locally from a basic plugin template
- Provide your GitHub credentials to publish your repo (100% secured)
- There is one folder per language code. If your plugin is not in English, rename this folder accordingly (ex: fr, es, de, it...)
Important: Users will only be able to use plugins which provide a folder in the language they use for Jarvisjarvis-weather-wunderground/ ├── README.md # description of your plugin ├── fr/ # language folder (can be cloned for new languages) │ ├── commands.md # where commands are defined in french │ └── functions.sh # (optional) functions used for translations ├── config.sh # (optional) variables to be set by the end user ├── functions.sh # (optional) functions to use in commands ├── install.sh # (optional) script to install external dependencies ├── uninstall.sh # (optional) script to uninstall external dependencies └── hooks/ # (optional) scripts ran for specific events of Jarvis ├── program_startup # (optional) ex: when Jarvis starts ├── ... # (optional) many other hooks are available... - Update
README.mdfile and fillin Description, Usage & Author sections.
The content of this file will be embedded in the Store as well as within Jarvis app.
- Add your commands in the
commandsfile (like injarvis-commands), ex:
*METEO*==say "Il fait beau" - (Optionnal) If you need configuration variables, add them in the
config.shfile:
⚠️ To avoid conflicts, previx your variables withjv_(JarVis)pg_(PluGin)xx_(a 2 letters code for your plugin, exwwfor Weather Wunderground)jv_pg_ww_city="Grasse" # some details on the variableand use them in your commands:
*METEO*==say "Il fait toujours beau à $jv_pg_ww_city"During the plugin installation, the user will be asked to fill in those variables
(Optionnal) If you need to create functions for more advanced commands, define them in the
functions.shfile: -
jv_pg_ww_check_weather () {
    ...
    # you can use $pj_pg_ww_city here
    ...
}
and use it in your commands:
*METEO*==say "$(jv_pg_ww_check_weather)"Check out the Public API Reference for other Jarvis functions you can use in your plugins
- Test your plugin, it is by default installed and enabled in your Jarvis
- Commit your changes, for example using the excellent GitHub Desktop

Finally, Click below to register it on the store
Yout plugin will be visible to all on the Store and within Jarvis app